I have been attaching labels to the rear of my stands; surprising readable for 3mm-high text but still small. Recently, I have been exploring the possibilities implicit in having magnetic bases. Have a look on my "general" blog.
This might be a better way to organize formations. The association between names formations and stands would become "virtual" but OTOH it makes it easier for me to use multiple rules sets and also makes dummy stands a lot simpler. I am considering the implications of this for my WWII forces.
Thursday, November 3, 2011
Tuesday, October 25, 2011
Some new bits and pieces
I had an idea a while ago for a Romanian shore battery to resist my Soviet BKA "floating tank".
Working with the folks at Pendraken, I ordered in a resin "PS31" - a 19 Century barbette gun position in resin. This is how the kit comes - that is, from right to left, a gun on fortress carriage, a fortress platform, and the position itself. The resin base is exactly 6cm wide across the rear.

Set up with a french heavy gun crew from the Franco Prussian War line it will be ready to disturb Fritz's lunch. It would, or coarse, work just fine with any gunners from the later half of the 19th Century.

Since Romanian coastal artillery were manned by sailors who used the Adrian helmet, a combination of French WWII and de-pom-pommed FPW sailors will make a good WWII crew. The gun is a 6" naval gun from the Boer War line where it is regularly sold on a railway mount.
 I've also obtained some Adrian-helmeted Pendraken SCW figures to add my Pendraken WWI French infantry to form the battery's Romanian Marine defense unit.
The guys at Pendraken were very nice about putting this together for me as a special order. I'll post WIP pics as I go forward.
Working with the folks at Pendraken, I ordered in a resin "PS31" - a 19 Century barbette gun position in resin. This is how the kit comes - that is, from right to left, a gun on fortress carriage, a fortress platform, and the position itself. The resin base is exactly 6cm wide across the rear.

Set up with a french heavy gun crew from the Franco Prussian War line it will be ready to disturb Fritz's lunch. It would, or coarse, work just fine with any gunners from the later half of the 19th Century.

Since Romanian coastal artillery were manned by sailors who used the Adrian helmet, a combination of French WWII and de-pom-pommed FPW sailors will make a good WWII crew. The gun is a 6" naval gun from the Boer War line where it is regularly sold on a railway mount.

The guys at Pendraken were very nice about putting this together for me as a special order. I'll post WIP pics as I go forward.
Tuesday, October 4, 2011
A Game!
The lads were on the table this weekend. The 410th, commanded by Ross, successfully defeated a German counterattack. The German I. Battalion, 252 GR was supported by Panzergrenadiers, Panzerjaeger IVs and StuGs from their own division and 116. Panzer; the 410. by SU-100s and SU-76 from a supporting mechanized corps.
The scenario was Reinforcement in Defense: Off Table from Grant's "Scenarios for Wargames." The Scenario features a starting force in a decent defensive position, with follow-on elements appearing at random times by random roads. The scenarios is designed for Horse and Musket and so calls for infantry and cavalry both light and heavy. We took a unit as 3 stands of infantry or infantry support or two vehicles.
The rules were Blitzkrieg Commander II; this was a big game for those rules with over 3500 points of Germans and a potential 2600 points of Soviets. Potential because each reinforcing units stood a 1:3 chance of taking the wrong turn and never showing up at all.
 The Reds deployed dug in on the ridge
 While the Germans planned to dash out from the woods on their right

 with the main armor through the central gap, and the panzergrenadiers in their SPWs ready both to exploit and threaten the soviet right.
as the Stuka slipped past the Soviet fighters and swept in with every promise of smashing both SUs, suddently it all came apart. Soviet AA fire drove off the Stuka while the battalion commander on the left bungled or had no action for three consecutive turns.
 As Soviet infantry began the march to the front, desperation set in. Ross graciously suggested that, in the absence of a blunder, a commander is always allowed one action for one formation.


At the midpoint of the game, finally moving from the wood and with everything concentrated on the Soviet left, the German attack started to move. The Nashorn delivered our first AFV kill.
But the grenadiers reached the ridge only to face the "Hurrahs" of the SMG-armed Soviet re-enforcements and the concentrated fire of the 410th's mortars.
 As German infantry began to fall, a Sturmovic arrived to add well-timed insult to injury.
 And swept off, ignorant of the confusion left on the ground.

The last straw was the arrival of two more SU100s on the German left, distracting the assault guns from their support mission while the German infantry perished under Soviet mortars and machine guns.
The shattered remnants of the grenadier regiment - less than half the force that had crossed the start line -- spoke of a decisive Soviet victory.
The scenario was Reinforcement in Defense: Off Table from Grant's "Scenarios for Wargames." The Scenario features a starting force in a decent defensive position, with follow-on elements appearing at random times by random roads. The scenarios is designed for Horse and Musket and so calls for infantry and cavalry both light and heavy. We took a unit as 3 stands of infantry or infantry support or two vehicles.
The rules were Blitzkrieg Commander II; this was a big game for those rules with over 3500 points of Germans and a potential 2600 points of Soviets. Potential because each reinforcing units stood a 1:3 chance of taking the wrong turn and never showing up at all.


 with the main armor through the central gap, and the panzergrenadiers in their SPWs ready both to exploit and threaten the soviet right.
as the Stuka slipped past the Soviet fighters and swept in with every promise of smashing both SUs, suddently it all came apart. Soviet AA fire drove off the Stuka while the battalion commander on the left bungled or had no action for three consecutive turns.


At the midpoint of the game, finally moving from the wood and with everything concentrated on the Soviet left, the German attack started to move. The Nashorn delivered our first AFV kill.
But the grenadiers reached the ridge only to face the "Hurrahs" of the SMG-armed Soviet re-enforcements and the concentrated fire of the 410th's mortars.


The last straw was the arrival of two more SU100s on the German left, distracting the assault guns from their support mission while the German infantry perished under Soviet mortars and machine guns.
The shattered remnants of the grenadier regiment - less than half the force that had crossed the start line -- spoke of a decisive Soviet victory.
Sunday, September 18, 2011
Soviet Naval Infantry
The 142nd Naval Infantry Battalion - ready to storm ashore to attack the fascists in their lairs. Famous for the defense of Leningrad, Novorossiysk, and Sevastopol; but naval infantry fought throughout Europe and in the Far East as well.
Here is the battalion:


There are three infantry companies, with their commander:

The heavy weapons company.
 And a forward observer ready to call in the fire of the fleet.
This force will be extended to a brigade. I have followed a standard infantry battalion structure with this unit, but I have since discovered that I could have been far more generous with the assignment of machine guns and mortars.
Here is the battalion:


There are three infantry companies, with their commander:

The heavy weapons company.

This force will be extended to a brigade. I have followed a standard infantry battalion structure with this unit, but I have since discovered that I could have been far more generous with the assignment of machine guns and mortars.
Friday, August 26, 2011
Soviet Field Artillery
The 346th Artillery Regiment supports the 80th Rifle Division. This is the still-mustering 1st Battalion

From the unit's right, two Zis-3 76.2mm guns and a 122mm howitzer. The rightmost gun crew is Minifigs, the others are Pendraken. On the unit's far left, the forward observer. The kneeling observer is Pendraken, the mounted horseholder is Wargames South, and the empty horse is Perrin. My Perrin Franco-Prussian war project did not have legs but they are unusual in casting riders and horse separately so have been a source of convenient horseflesh.
 A close-up of the howitzer. All these guns should have horse-drawn limbers -- a fact that is high on my completions list.
 Of course, much of the time they will be off table, with the observer calling in fire.

From the unit's right, two Zis-3 76.2mm guns and a 122mm howitzer. The rightmost gun crew is Minifigs, the others are Pendraken. On the unit's far left, the forward observer. The kneeling observer is Pendraken, the mounted horseholder is Wargames South, and the empty horse is Perrin. My Perrin Franco-Prussian war project did not have legs but they are unusual in casting riders and horse separately so have been a source of convenient horseflesh.


Thursday, August 25, 2011
An Independent Tank Regiment
The 119th Separate Tank Regiment was an interesting real-world unit formed as part of the Red Army by ethnic Armenians. This representation is a bit understrength - it needs three more T35/85's to make up full strength.
 The formation has a sub-machine-gun company, a command element, reconnaissance, and of course two tank companies.

The T34/85 Tanks are from Wargames South. They are some of the nicest models on the market; they do come at a premium price.
 The recon armored car is from Minifigs; the crewman having a look-see was a Minifigs artillery crewman.

SMG and Command are all Pendraken.

The T34/85 Tanks are from Wargames South. They are some of the nicest models on the market; they do come at a premium price.

German Infantry
Our first German unit is 1st Battalion, 252nd Infantry Regiment, 10th Infantry Division

At the front left the reconnaissance team, then the battalion commander. Three companies, each of three rifle platoons; on the right each has a supporting MG42 from the weapons company. At the rear, units right to left, the engineer platoon, and two Panzerschreck teams from the regimental AT company.
At the left front a mortar, and behind it the 75mm battalion gun. All the figures here are from Pendraken.
 A close-up of the battalion gun. All equipment and specialists beyond the most generic are labelled with the type on the right rear of the stand, as well as the ID on the rear.

At the front left the reconnaissance team, then the battalion commander. Three companies, each of three rifle platoons; on the right each has a supporting MG42 from the weapons company. At the rear, units right to left, the engineer platoon, and two Panzerschreck teams from the regimental AT company.
At the left front a mortar, and behind it the 75mm battalion gun. All the figures here are from Pendraken.

Wednesday, August 24, 2011
A Red Army Rifle Regiment
To be specific, the 410th Rifle Regiment, 80th Lubanskaya Order of Kutuzov 2nd Class Rifle Division. I am basing the formation on the late war Soviet TOE to be found in the Army Overview pdf from Command Decision:Test of Battle. I have modified the details to work with the Blitzkrieg Commander rules, which has very different command rules but the same stand=platoon backbone.
First, the regimental assets:

From the unit's right, front rank:
In Blitzkrieg Commander the typical battlegroup is a re-enforced regiment; the command stand is therefore set up to be the highest ranking stand on the board.
Next, the 1st Battalion:

Command stand, 6 rifle stands in three companies, 2 machine gun stands, and a mortar. All Pendraken
Likewise, 2nd Battalion:

Except -- the officer in the right front rife stand waving his pistol over his head to encourage his men is from Minifigs. The Minifigs figures are slight but can be mixed in moderation with Pendraken figures when the equipment size differences are not too jarring.
First, the regimental assets:

From the unit's right, front rank:
- 45 mm AT gun, Pendraken gun and crew. The limber is from Pendraken's WWI line but the rider is from Wargames South.
- The regimental scouts, in their cammo suits. Recon is a big deal in any good WWII game -- in BKC well-employed recon increases the command value of a nearby command stand.
- The commander himself, with his team. The burned-out Panzer IV is from Minifigs. I found the sample a bit fiddly to assemble; wrecked I could manage. The mounted officer is a very handy figure; he was designed as the commander from the Pendraken WWI Russian cavalry.
- On the left flank, the 120mm Mortar (Pendraken again) with its limber.
- Right-rear the anti-tank riflemen of the AT company, and the Sub-machine gun company on the left; a handy regimental reserve.
In Blitzkrieg Commander the typical battlegroup is a re-enforced regiment; the command stand is therefore set up to be the highest ranking stand on the board.
Next, the 1st Battalion:

Likewise, 2nd Battalion:

Except -- the officer in the right front rife stand waving his pistol over his head to encourage his men is from Minifigs. The Minifigs figures are slight but can be mixed in moderation with Pendraken figures when the equipment size differences are not too jarring.
Tuesday, August 23, 2011
A Romanian Battalion
These are the most recent models to be added to my armies, but are a nice start point because they are a seldom-covered subjects and (since they are a small force) can illustrate a few starting ideas.
The Romanians have an extra appeal to a wargamer as one of the few armies that can actually be used on both sides in WWII. The Romanians provided more troops the the German war effort than any other ally, fighting at Odessa and the capture and defense of the Crimea. They suffered mightily at Stalingrad. As the Red Armies entered Romania in 1944 the Romanians decided they had had enough, vacated the front lines and drove the German forces out of the capital. For the balance of the war select formation carried on as Soviet allies. The best website for matters pertaining to the Romanian experience can be found here.
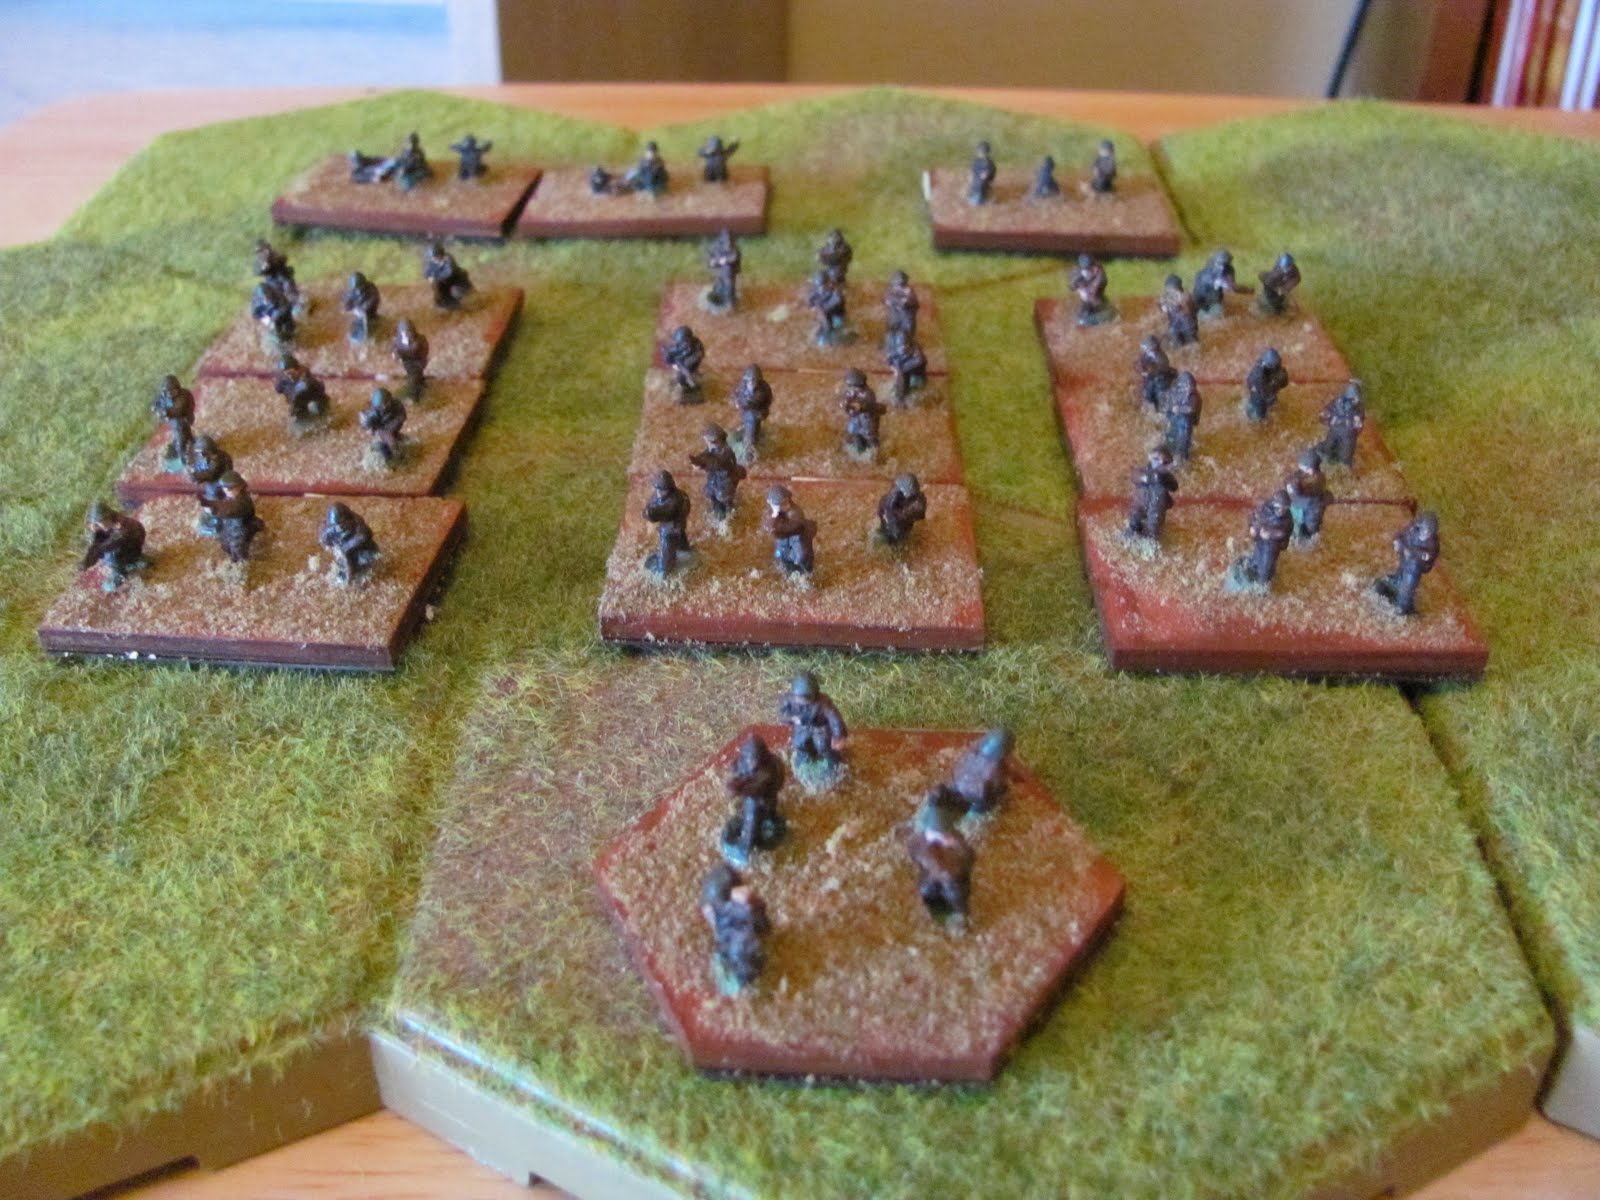
This is the 1st Battalion, 3rd Motorized Vanatori Regiment, 1st Armored Division. Vanatori is a Romanian term that once designated a type of infantry (I think roughly equivalent to the German Jäger) retained by some regiments as a part of the regimental tradition.
 At the front, the hexagonal command element. The formation is based for Blitzkrieg Commander; I hasten to add that the odd base shapes are my own innovation. I think they improve stand type recognition, but you do not need hexagonal stands to play the game.
Behind them three infantry companies, each of 3 stands. At the very rear at the viewers left (the unit's right) are the machine guns of the machine gun company and on the other flank the mortar stand.
 Most figures in this force are Pendraken who do a lovely line of Romanian WWII Infantry, except for these machine-gunners who are from Pithead, who offer the more "trademark" Zb machine gun.
As a motorized formation, obviously they are still missing their trucks. I will fill out the rest of the regiment along with a share of divisional assets and the especially the Armored regiment. I also want to produce leg infantry and cavalry forces for various phases of the war.
 As you can see, basic Romanian uniforms at 10mm do not require a lot of complicated detail work; a battalion can be fielded very quickly.
The Romanians have an extra appeal to a wargamer as one of the few armies that can actually be used on both sides in WWII. The Romanians provided more troops the the German war effort than any other ally, fighting at Odessa and the capture and defense of the Crimea. They suffered mightily at Stalingrad. As the Red Armies entered Romania in 1944 the Romanians decided they had had enough, vacated the front lines and drove the German forces out of the capital. For the balance of the war select formation carried on as Soviet allies. The best website for matters pertaining to the Romanian experience can be found here.
This is the 1st Battalion, 3rd Motorized Vanatori Regiment, 1st Armored Division. Vanatori is a Romanian term that once designated a type of infantry (I think roughly equivalent to the German Jäger) retained by some regiments as a part of the regimental tradition.
Behind them three infantry companies, each of 3 stands. At the very rear at the viewers left (the unit's right) are the machine guns of the machine gun company and on the other flank the mortar stand.

As a motorized formation, obviously they are still missing their trucks. I will fill out the rest of the regiment along with a share of divisional assets and the especially the Armored regiment. I also want to produce leg infantry and cavalry forces for various phases of the war.

My 10mm WWII experience
When I decided to return to miniatures gaming after a long absence, I played with a number of different projects, most of which never really worked for me. As a part of that process I decided to look at WWII. Initially I was thinking 1:300 or so since that was the big scale here when I was last considering an army. I was diverted from that by a chance purchase of a stack of 1:144 Dragon Panzerkorps kits of Stugs. I was rapidly hooked. I found that my half-century old eyes could see the 10mm models about as well as my teenage eyes had been able to make out the 1:300 figures; and the figures are still cheap enough that I could afford both sides of a conflict.
I rapidly discovered that 10m (which is also described as 12mm), like most wargames "figure height masquerading as a scale" measurements, is a pretty vague term. Effectively, a single army when carefully assembled can include everything from largish 1:144 down to "American n-scale" 1:160. I generally describe the "scale" as 1:150±10.
As I post here I will try to illustrate some of what I have discovered, as well as providing links (where I have them) for the various manufacturers I use. I have just started organizing my models into units based on 1-stand = 1-platoon TOEs I have obtained from various sources, so the first few posts at least will feature "parade reviews" of those units I have organized completely.
 A key part of the plan here is not only organizing the formations but labeling every stand with its place in the TOE. This is stand A, 1st Company, 1st Battalion (Germans used Roman numerals for some levels), 252nd Infantry Regiment. Its is type "Infantry" and the little flag (if I use rules at some point that call for it) indicate a company command stand.
 Once complete, labelled and magnetized, each unit will be stored in a Belgian cookie tin with as authentic a label as I can muster.
I rapidly discovered that 10m (which is also described as 12mm), like most wargames "figure height masquerading as a scale" measurements, is a pretty vague term. Effectively, a single army when carefully assembled can include everything from largish 1:144 down to "American n-scale" 1:160. I generally describe the "scale" as 1:150±10.
As I post here I will try to illustrate some of what I have discovered, as well as providing links (where I have them) for the various manufacturers I use. I have just started organizing my models into units based on 1-stand = 1-platoon TOEs I have obtained from various sources, so the first few posts at least will feature "parade reviews" of those units I have organized completely.


Subscribe to:
Posts (Atom)